Many people assume all hair extensions work the same way. In reality, the differences between methods are significant. Some last only a day, while others stay for months. The right choice depends on your hair type, lifestyle, and budget. This article breaks down the major types of hair extensions, how they are applied, and what to expect from each. Readers exploring types of hair extensions will also find context in Understanding Wavy Hair Types: A Complete Guide to Type 2A, 2B, and 2C
How Hair Extension Methods Evolved from the 1990s to Today
The modern hair extension industry began taking shape in the 1990s. Improved bonding techniques made extensions more accessible and reliable. Before that, options were limited to wigs and basic clip-in pieces. In 1997, the first keratin fusion bonds appeared in salons. This allowed individual strands to be attached with heat. By the early 2000s, tape-in extensions gained popularity for their flat, discreet application. Micro-link (or micro-bead) methods emerged around 2005, offering a glue-free and heat-free alternative. The 2010s saw the rise of hand-tied wefts, which are lightweight and lie flat against the scalp. Today, clip-in and tape-in extensions remain top choices for versatility and minimal damage. The industry continues to innovate, with halo extensions and I-tip strands becoming more common in recent years. Background on types of hair extensions is documented in 9+ Different Types of Hair Extensions & Top Fusion Methods (2026)
Clip-In vs. Tape-In vs. Sew-In: Key Differences in Application and Wear
Clip-in extensions are the most user-friendly option. They come with small clips attached to wefts. You can apply them at home in minutes. They are temporary and should be removed daily. Tape-in extensions use adhesive strips. A professional must apply them, sandwiching a thin section of natural hair between two wefts. They last six to eight weeks before needing adjustment. Sew-in extensions, also called weaves, require braiding the natural hair into cornrows. The wefts are then sewn onto the braids with a needle and thread. This method works best for thick or coarse hair. It can last up to eight weeks but may cause tension if installed too tightly. Each method has trade-offs. Clip-ins offer flexibility but can slip. Tape-ins lie flat but require salon visits. Sew-ins are secure but limit access to the scalp for washing.
Fusion, Micro-Link, and I-Tip Extensions: A Deep Dive into Bonded Methods
Fusion extensions use keratin-based bonds. Each strand is attached to natural hair with a heating tool. The bond melts and hardens, creating a strong hold. This method lasts three to four months. It works well for fine hair because the bonds are small. However, removal requires a special solvent, and heat can damage natural hair if not done carefully. Micro-link extensions, also called micro-beads, use small metal beads or rings. The stylist threads natural hair through the bead, then adds the extension strand and clamps the bead shut. No glue or heat is involved. This makes micro-link a popular choice for people with sensitive scalps. The beads can be adjusted as hair grows. I-tip extensions are pre-tipped with a small keratin or silicone tip. They are attached using beads, similar to micro-link. I-tips are especially suited for fine or thin hair because the tips are narrow and blend well. All three methods require professional installation and removal. They offer a natural look and long wear, but maintenance appointments are needed every six to eight weeks.
| Method | Application | Lifespan | Best For |
|---|---|---|---|
| Clip-In | Self-applied with clips | Daily removal | Temporary volume or length |
| Tape-In | Adhesive strips, professional | 6–8 weeks | Fine to medium hair |
| Sew-In (Weave) | Sewn onto braids | 6–8 weeks | Thick or coarse hair |
| Fusion | Keratin bonds with heat | 3–4 months | Fine hair, long-term wear |
| Micro-Link | Metal beads, no glue/heat | 3–4 months | Sensitive scalp, all hair types |
| I-Tip | Pre-tipped strands with beads | 3–4 months | Fine or thin hair |
The Origins of Hair Extensions: From Ancient Egypt to Modern Salons
The desire for longer, fuller hair is not new. Ancient Egyptians used wigs and hairpieces made from human hair, wool, and plant fibers. They were worn for fashion and to protect the scalp from the sun. In ancient Rome, women used hairpieces to create elaborate styles. During the Renaissance, wigs became popular among European nobility. The modern hair extension as we know it began in the 1950s. Hair weaves were used by African American women to add length and volume. The technique involved braiding natural hair and sewing in wefts. In the 1960s, synthetic fibers became available, making extensions more affordable. The 1990s brought significant advancements. Keratin bonds and heat fusion allowed for individual strand attachment. This gave a more natural look than wefts. Tape-in extensions were introduced in the early 2000s. They offered a flat, comfortable alternative. Today, the industry is global. Human hair extensions, especially Remy and Virgin hair, are prized for their quality. The market continues to grow, with new methods like hand-tied wefts and halo extensions gaining traction.
Frequently Asked Questions
Where can I buy high-quality human hair extensions?
Reputable beauty supply stores and online retailers specializing in hair extensions are good sources. Look for sellers that specify Remy or Virgin hair, as these indicate cuticle-aligned strands for less tangling. Always read customer reviews before purchasing.
How many types of hair extensions are commonly available?
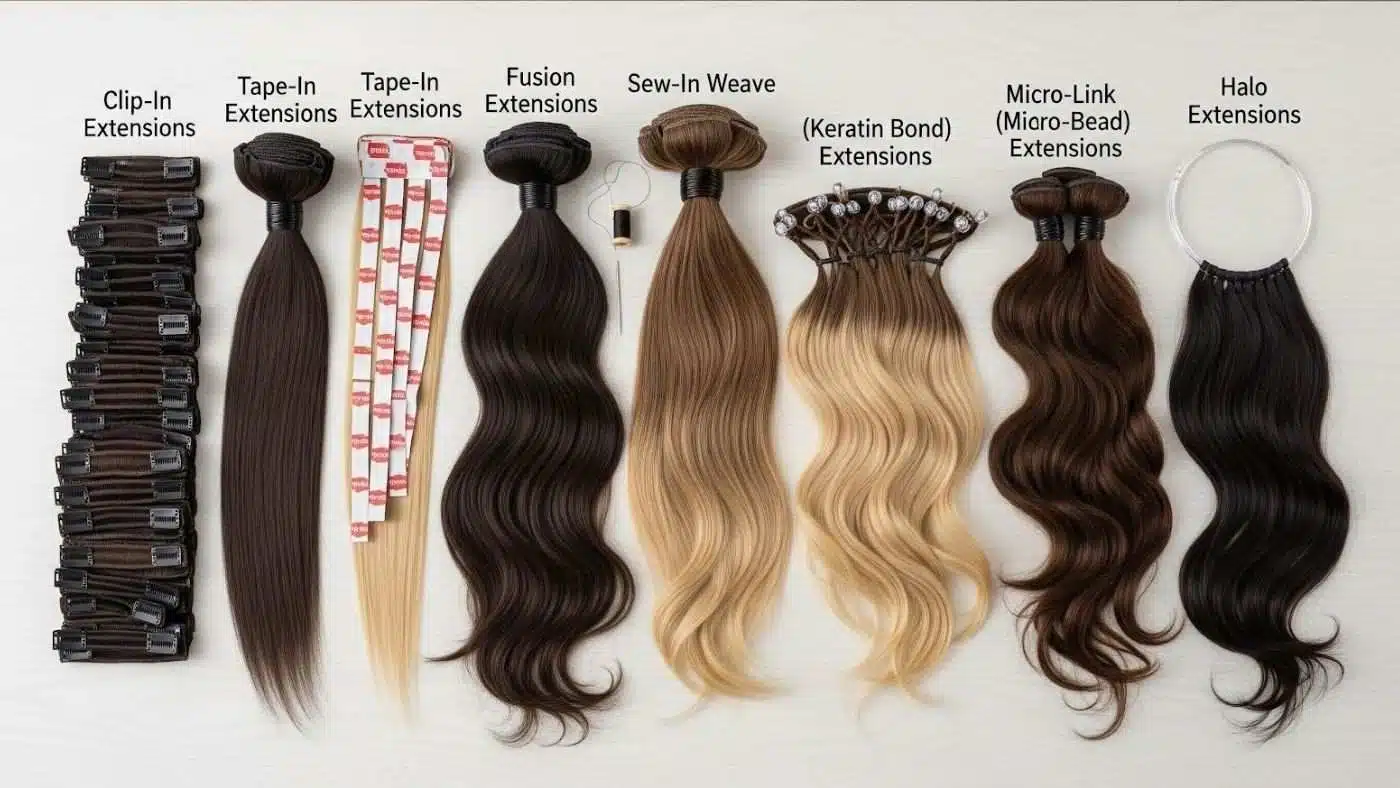
There are at least seven major types: clip-in, tape-in, sew-in, fusion, micro-link, I-tip, and halo extensions. Each varies in application method, lifespan, and suitability for different hair types and textures.
How does a sew-in weave differ from tape-in extensions?
A sew-in weave involves braiding natural hair into cornrows and sewing wefts onto the braids. Tape-in extensions use adhesive strips to sandwich a thin layer of natural hair. Sew-ins are more secure for thick hair, while tape-ins are flatter and better for fine hair.
Who is the best candidate for micro-link extensions?
Micro-link extensions work well for people with fine to medium hair who want a long-term, glue-free option. They are also suitable for those with sensitive scalps because no adhesive or heat is used. However, they require regular maintenance every six to eight weeks.
When did tape-in extensions become widely used in salons?
Tape-in extensions gained popularity in the early 2000s. Their flat, discreet application made them a favorite among stylists and clients. By the 2010s, they were one of the most requested methods for adding length and volume without significant damage.
How to Choose the Right Hair Extension Type for Your Hair Texture
Your natural hair texture plays a major role in determining which extension method will work best. Fine or thin hair often benefits from tape-in or I-tip extensions because they lie flat and do not add bulk. Clip-ins can also work, but the clips may be visible if the hair is very fine. For medium to thick hair, sew-in weaves and micro-link extensions provide a secure hold. Curly or coily hair textures require special consideration. Sew-in weaves are a classic choice for natural curls, as the braided base blends well. However, tape-ins and fusion bonds can also be used if the stylist takes care to match the curl pattern. Straight hair works with almost any method, but fusion and micro-link tend to look most natural. The key is to consult a professional who has experience with your specific hair type. They can assess the density and strength of your hair to recommend a method that minimizes stress and breakage.
Maintenance and Care Tips for Long-Lasting Hair Extensions
Proper care extends the life of your extensions and protects your natural hair. For clip-in extensions, always remove them before sleeping, showering, or swimming. Brush them gently with a loop brush or a wide-tooth comb to avoid pulling at the bonds. Tape-in and sew-in extensions require regular washing with sulfate-free shampoo. Focus on the scalp and avoid rubbing the wefts vigorously. Condition the mid-lengths and ends, but keep conditioner away from the tape or bonds. After washing, pat the hair dry with a towel and let it air dry when possible. Heat styling is safe on human hair extensions, but use a heat protectant spray and keep the temperature moderate. For fusion and micro-link extensions, avoid applying conditioner or oil directly to the bonds or beads, as this can loosen them. Schedule maintenance appointments every six to eight weeks. The stylist will move the extensions up as your natural hair grows and check for any damage. Sleeping with a silk or satin pillowcase reduces friction and prevents tangling. Braiding the hair loosely before bed also helps maintain the style.
Common Mistakes to Avoid When Wearing Hair Extensions
One frequent mistake is choosing extensions that are too heavy for your natural hair. Heavy wefts can pull on the roots and cause traction alopecia, a form of hair loss. Always match the weight of the extensions to your hair’s density. Another error is neglecting to trim the extensions after installation. Extensions often come with blunt ends that look unnatural. A professional trim shapes them to blend with your own hair. Overwashing is also common. Extensions do not need to be washed as often as natural hair because they do not produce scalp oils. Washing once or twice a week is usually sufficient. Using the wrong brush can damage the bonds or wefts. Avoid brushes with ball-tipped bristles, as they can snag. Instead, use a loop brush designed for extensions. Sleeping with wet hair is another risk. Wet hair is more fragile, and extensions can mat or tangle overnight. Always dry the hair completely before bed. Finally, skipping professional removal is a costly mistake. Pulling out tape-ins or fusion bonds at home can rip out natural hair. Always have a stylist remove them safely.
Cost Comparison of Different Hair Extension Methods
The cost of hair extensions varies widely based on the method, hair quality, and salon location. Clip-in extensions are the most affordable option. A good-quality set of Remy human hair clip-ins can range from $100 to $400. Tape-in extensions cost more because they require professional application. The hair itself may cost $200 to $600 per set, and installation adds another $200 to $500. Sew-in weaves are moderately priced. The hair wefts cost $100 to $400, and the installation fee is typically $150 to $300. Fusion extensions are among the most expensive. The hair strands can cost $400 to $1,000, and the application process takes several hours, with fees ranging from $300 to $800. Micro-link and I-tip extensions fall in a similar price range. The hair costs $300 to $800, and installation is $300 to $600. Maintenance appointments add to the overall expense. Tape-ins need to be moved up every six to eight weeks, costing $50 to $150 per visit. Fusion and micro-link also require regular tightening. Over a year, the total cost can be significant, so it is important to budget accordingly. Some salons offer payment plans, and buying hair online can reduce costs, but quality should not be compromised.